January 13, 2014

Book Review: All Things Paper

Hello blog-land!

Today I'm sharing a review on Ann Martin's book "All Things Paper".  I've had the book in my possession for a few weeks now and have looked over it a few times.

I hadn't tried my hand at any projects because I've been suffering from SEVERE tendonitis in my wrist due to all the twisting and pinching that quilling involves.  But I decided to sacrifice my hand and give 2 of the book's projects a try.

I chose two of the jewelry projects designed by Ann herself.  The instructions were SUPER detailed and easy to follow.  It took me about an hour and a half to complete the two projects, but I was lacking some of the supplies so I had to brainstorm my way around it.

The first project is the "Teardrop Orb Pendant".  A very easy project, even for a beginner quiller and the finished product is pretty great.  My mother-in-law fell in love with it so I gave it to her.


The next project was the "Antique Key Pendant".  From the moment I laid eyes on it I knew that I wanted to make this one.  I didn't have enough of the paper required on hand so I brainstormed and ended up using strips from my handmade paper stash.  For the top part I had to use two different colors, a grey and the green.  But all in all I really love the way it turned out.  The one in the book looks like an actual gold key. Mine looks a lot more like paper, but I think it's pretty charming.

I didn't notice any use of a circle sizer and Ann also uses a needle tool a lot.  Needle tools require lots of wrist action, so the body of my key turned out kind of wonky.  But some people are really good with the needle tool.


All in all I love the projects I tried and I'm motivated to try a few more, like the "Sticky Notes Notepad Holder".   These are great projects for a lazy Saturday afternoon and many of them can even be made with/by kids.  There's something for everyone from a beginning paper crafter to an experienced one.

Ann's book is available on Amazon here.

On another note, I'm working on getting my hand all better so I can unveil the Sweet Spot's new direction soon.  Life has me quite stressed and busy but I need to keep my paper crafting in it cuz it makes me happy!

I hope January is treating you well and that none of you froze from the arctic weather we've experienced.  Until later, my peeps!

Stay Sweet!


November 5, 2013

Creative Paper Quilling

The day has finally arrived when I can share with you more details about the book project I took part in a few months back.


Many of you are already aware that there is a new quilling book available from Annie's called Creative Paper Quilling.  It is a truly beautiful book authored by Ann Martin of All Things Paper.  There are tons of gorgeous projects inside ranging from beginner to advanced.

I was approached to create a project and I just decided to create one of the many projects that I have floating around in my head.  It's on-edge quillography but I implemented an easy way to get those letters just right.  There are detailed step-by-step instructions, templates, and material sources in the book.  No detail was spared.  You can order your copy here.

Here's a more detailed shot of my project, which just so happened to make the cover art.  I remember the day that Tanya Fox, Editor at Cardmaker, told me that my project had been chosen for the cover.  I screamed for a few minutes and then immediately shared it with my hubby.


Then, a few weeks ago I got a google alert and saw the cover for the first time.  Again, I screamed for a few minutes and even scared one of my kids out of the shower!  HA!  The project went by pretty quickly.  The flowers took the longest to make and once they were done I was able to assemble the letters and the other elements in the same day.  

I have yet to receive a hard copy but I've seen many of the images from inside and I can tell you, it's truly a beautiful book!  

Another quiller that took part in the book is my neighbor Linda Krieg (she and I live in the same town in NYC - can you really say town here?).  Go on and take a look at her blog to check out her project.  She can be found at My Quilling Nest.

I hope you guys have a lovely first Tuesday in November!  I know I've been pretty scarce with my blog posts lately, but this is just the way life is panning out right now.  I'll be sure to share any news or projects whenever I can.  But, in any case, stay SWEET my peeps!

Oh!  I'm back on Instagram!  Be sure to follow me.  An icon with the link is on the sidebar.

September 24, 2013

Paper Craspedia

Hello, all!

Today I want to share a super quick and easy tutorial on how to make non-dust-collecting craspedia. I've had these pics in my computer for a LOOOONG time so I thought I'd take advantage and post them today.


I've seen lots of tutorials for  Felt Billy Balls, (a.k.a Billy Buttons) which happen to be super cute, but you know me and dust.  I like to make things that are damp-wipe-friendly.  That way everything is clean and dust mites have to find somewhere else to live.


You will need:

  • Small sytrofoam balls (about 3/4 to 1 inch in diameter)
  • Paper Mod Podge (truthfully, I think you can use any Mod Podge)
  • Flocked Stems - Okay, here's a hard one - I got these at West Elm ages ago.  But you can use regular florist wire or any nice green stem-y looking thing you can find laying around - be creative!
  • Paint brush 
  • Bright yellow mulberry paper - found at any craft store

Now the fun begins!  Seriously you're gonna slap yourself once you realize how easy this is! 

  1. Stick the stem into the styrofoam ball
  2. Cover the ball with Mod Podge
  3. Stick the mulberry paper all over it - I rip it into small pieces, but you can do one fell swoop, if you prefer
  4. Put tons more Mod Podge on top 
  5. Let dry
I love the little pop of color they add to a corner and, even more, I love the fact that I made them.  There's nothing better than looking around your home and seeing things that mean something to you.  Be it pictures, artwork, handmade projects or gifts from loved ones.  I remember Nate Berkus was on Oprah one time and he said that all homes should have "soul" and I think that these things definitely add just that to any space.


More news soon.  Perhaps some of you have inadvertently seen the news, if you subscribe to google quilling alerts.  Just waiting for the right time to share. Stay tuned and have an awesome last week of September!


August 29, 2013

Remember me?

Hello, all!

I can't believe it's been almost 3 months since I last posted anything.  I'm so sorry.  This Summer has flown by and I can't even remember what happened.  I've missed you!

I guess I've been adjusting to my new work schedule.  I did get a large order in July and that has had me busy, too.  It seems like after the book project and the craft fair, I just fizzled out and found myself in desperate need of a break. Unfortunately, life doesn't really give you many breaks.

On another note, I have reluctantly become a vegetarian.  I got really sick about a month and a half ago and I realized I needed to do something drastic.  So I've also been busy with trying to feel better and finding healthier options that'll make vegetarian living easy for me and my family.  They can have meat whenever they want, but I'm not cooking it!  I'm happy to report that I am actually feeling better.  Still not 100%, but I can feel a difference.  When you have a chronic illness, you kind of get used to always feeling crappy.  I don't want to feel that way anymore, so I keep trying to find ways to get better.  Here's to not giving up!

Ok, in paper related news (cuz I know that's what you're here for) I'd like to share my first pattern with you all here on this blog, as well as some work-in-progress pics of that order I've been trying to hammer (or, roll) out.

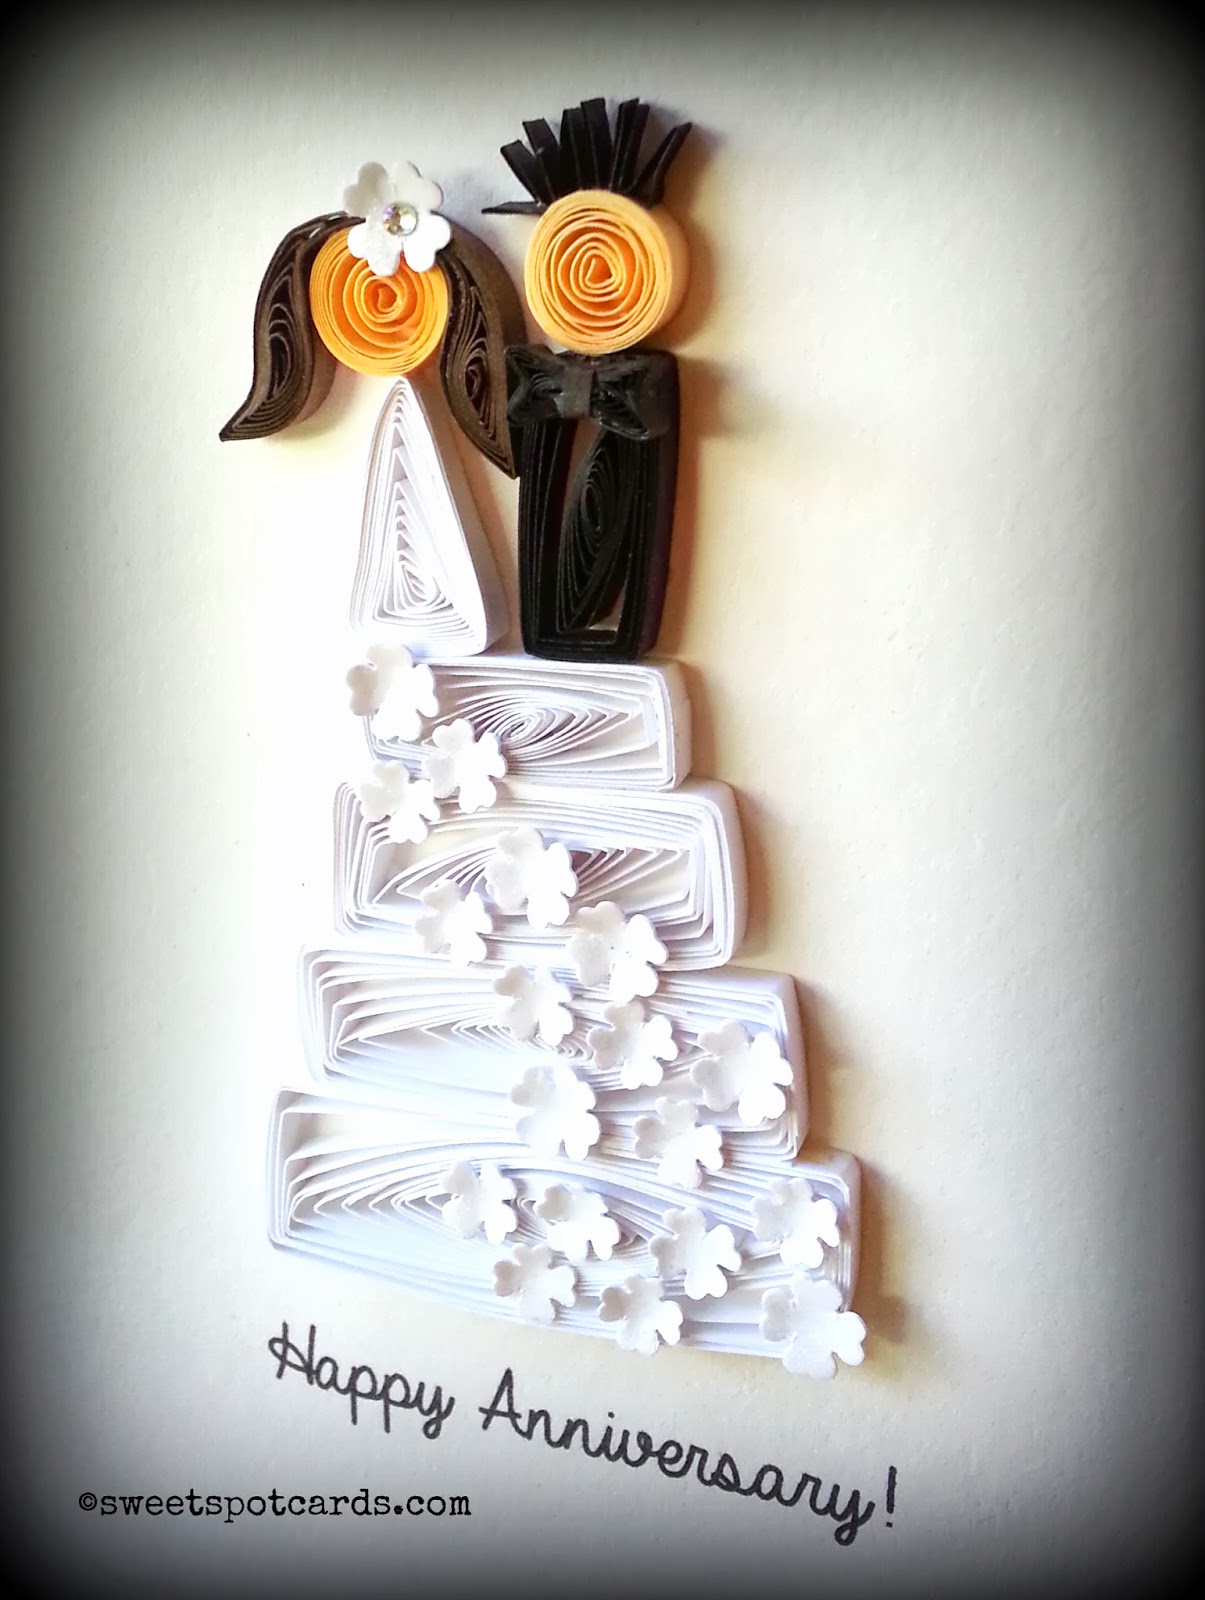
I created this card for some friends who just celebrated their 25th wedding anniversary.  I figured it was a great time to clear my head of all the cameras I've been rolling and do something different.  It was so easy I figured I'd share the pattern with you all:


You will need:

9 strips of white quilling paper
1 small sheet of white metallic paper
a tiny flower punch
2 strips of black quilling paper
1 strip of dark brown quilling paper, or black, yellow or orange (depending on hair color)
1 strip of peach (or brown) quilling paper
Quilling workboard or ruler
Tweezer to handle small pieces
Your favorite white glue

So, for the cake I made 4 layers (yum).  The bottom layer is made up of 3 strips.  I didn't use the quilling board for this one because I wanted it to be big.  So I just allowed the strips to roll out as I controlled them a bit with my fingers.  I think a 1 3/4 - 2 inch circle would work great.

The second layer gets 2 strips and, also a bit bigger than the number 0 circle (1 inch) on the workboard.  Probably about 1.5 inches.

The third layer is also 2 strips but this time I used number 0 on the workboard (1 inch).

The last layer is 1 strip and I used number 1 on the workboard (3/4 inch).

You don't necessarily have to have a workboard.  You can use a ruler and just allow the coil to relax up to the desired measurement.  But workboards are really convenient to use, especially if you're making more than one of anything.


Now that you've got all your circles, you can then shape them into rectangles.  Pinch into a marquise and then pinch again at 2 more points.  For more on making rectangles and most other shapes, click here.


Now you just glue all your pieces in ascending order.  Punch out some tiny flowers and assemble on the cake in whatever pattern you like.

For the bride I used 1 strip in the size 1 circle (3/4 inch) and made an isosceles triangle.  I used half a strip of peach quilling paper in the size 3 circle on the board (1/2 inch).  I cut an extra flower out for her hair and added a tiny bit of bling for the center.  I created her hair by using two-half strips of brown quilling paper, size 2 (5/8 inch) on the board and creating very double-curved marquise shapes.


There is no guide for this.  Just keep shaping your paper.  
It'll do what you want it to, trust me! ;)

For the groom I simply used 1 strip of black paper at size #1 on the board (3/4 inches) and shaping it into a long rectangle.  He also got the same size head as the bride a full size 3 on the board.  I made his hair with an inch of black paper that I zig zagged to make a spiky 'do.  His bow tie was the cream on top of the whole deal because it took me the longest to figure out.

Use half a strip in the size 5 circle (3/8 inch)  created a tight rectangle and then pinch the middle part in with a tweezer (step 4 in picture below).  Also pinch in the sides with your nail to create a bow effect (steps 5 & 6 below).  I used a tiny strip of paper I cut in half length-wise as the center of the bow. Glue that to the center and there's your bow!


Voila!  Your cute wedding/anniversary card.


It was nice to make something different and with no pressure for time or preference.  Anybody else ever feel that way?

But, I still have 20 calendars to churn out so I have to say bye for now.  Here is a compilation pic of the 60 cameras I had to make for the card portion of the order.  Now I have to finish 240 more cameras.  You gotta laugh it off and keep on rolling!


I have lots more to catch up on, like my recent trip to Chicago, my special news about the book project and even special-er news about the Sweet Spot and a few changes coming soon.

I can't promise any specific dates when I'll share these things, but I do hope to do so very soon.  Enjoy your last week of Summer, if you're in the North, and make it a SWEET one!


Please note:  The pattern shared if for personal use ONLY.  Please do NOT sell items with this design on it and do not redistribute these instructions without proper accreditation. Thank you!